Contact Methods
There are a number of ways that the SUSE Manager Server can communicate with traditional and Salt clients. Which one you use depends on your network architecture.
SUSE Manager Daemon (rhnsd)
The SUSE Manager daemon (rhnsd) runs on traditional client systems and periodically connects with SUSE Manager to check for new updates and notifications.
It does not apply to Salt clients.
It is only used on SUSE Linux Enterprise 11 and Red Hat Enterprise Linux Server 6, as these systems do not use systemd.
On later operating systems, a systemd timer (rhnsd.timer) is used and controlled by rhnsd.service.
Start the daemon with /etc/init.d/rhnsd.
By default, it will check every four hours for new actions. This means it can take some time for clients to execute scheduled actions.
To check for updates, rhnsd runs the external mgr_check program located in /usr/sbin/.
This is a small application that establishes the network connection to SUSE Manager.
The SUSE Manager daemon does not listen on any network ports or talk to the network directly.
All network activity is performed by the mgr_check utility.
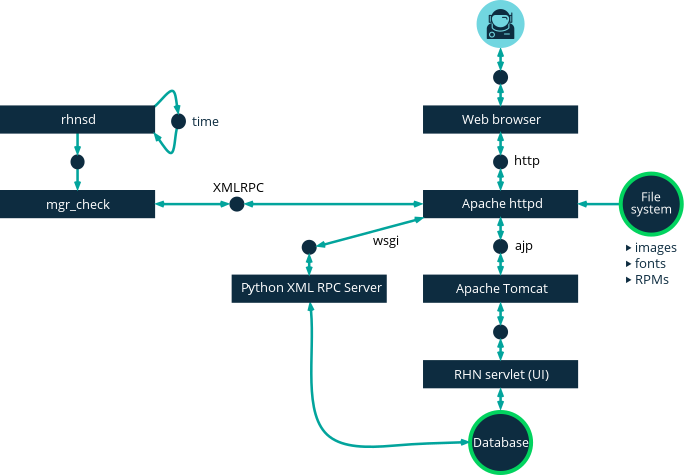
This figure provides an overview of the default rhnsd process path.
All items left of the Python XMLRPC server block represent processes running on a SUSE Manager client.
Configure rhnsd
The rhnsd initialization script has a configuration file on the client system at /etc/sysconfig/rhn/rhnsd.
An important parameter for the daemon is its check-in frequency. The default interval time is four hours (240 minutes). The minimum allowed time interval is one hour (60 minutes). If you set the interval below one hour, it will change back to the default of 4 hours (240 minutes).
On SUSE Linux Enterprise 12 and later, the default time interval is set in /etc/systemd/system/timers.target.wants/rhnsd.timer, in this section:
[Timer]
OnCalendar=00/4:00
RandomizedDelaySec=30min
You can create an overriding drop-in file for rhnsd.timer using systemctl:
systemctl edit rhnsd.timer
For example, if you want configure a two hour time interval:
[Timer]
OnCalendar=00/2:00
The file will be saved as /etc/systemd/system/rhnsd.timer.d/override.conf.
For more information about system timers, see the systemd.timer and systemctl manpages.
If you modify the rhnsd configuration file, execute this command as root to restart the daemon and pick up your changes:
/etc/init.d/rhnsd restart
To see the status of rhnsd, use this command as root:
/etc/init.d/rhnsd status
Push via SSH
Push via SSH is used in environments where traditional clients cannot reach the SUSE Manager Server directly. In this environment, clients are located in a firewall-protected zone called a DMZ. No system within the DMZ is authorized to open a connection to the internal network, including the SUSE Manager Server.
The Push via SSH method creates an encrypted tunnel from the SUSE Manager Server on the internal network to the clients located on the DMZ. After all actions and events are executed, the tunnel is closed.
The server uses SSH to contact the clients at regular intervals, checking in and performing scheduled actions and events.
This contact method works for traditional clients only. For Salt clients, use Push via Salt SSH.
|
Re-installing systems using the provisioning model is not currently supported on clients managed with push via SSH. |
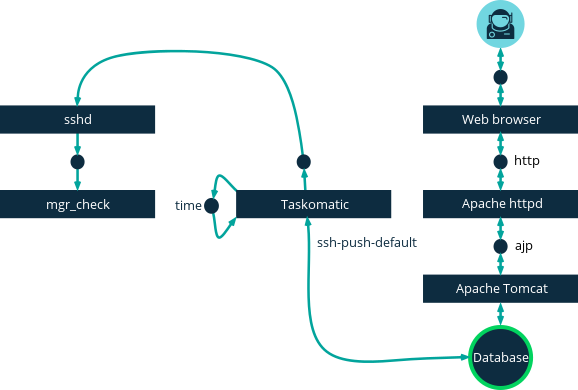
This image demonstrates the push via SSH process path.
All items left of the Taskomatic block represent processes running on a SUSE Manager client.
For tunneling connections via SSH, two available port numbers are required, one for tunneling HTTP and the second for tunneling via HTTPS (HTTP is only necessary during the registration process).
The port numbers used by default are 1232 and 1233.
To overwrite these, you can add two custom port numbers greater than 1024 to /etc/rhn/rhn.conf:
ssh_push_port_http = high_port_1
ssh_push_port_https = high_port_2
If you would like your clients to be contacted using their hostnames instead of an IP address, set this option:
ssh_push_use_hostname = true
It is also possible to adjust the number of threads to use for opening client connections in parallel.
By default two parallel threads are used.
Set taskomatic.ssh_push_workers in /etc/rhn/rhn.conf:
taskomatic.ssh_push_workers = number
For security reasons, you might want to use sudo with SSH, to access the system as an unprivileged user instead of as root.
-
Ensure you have the latest
spacewalk-taskomaticandspacewalk-certs-toolspackages installed on the SUSE Manager Server. -
On each client system, create an appropriate unprivileged user on each client system.
-
On each client system, open the
/etc/sudoersfile and comment out these lines:#Defaults targetpw # ask for the password of the target user i.e. root #ALL ALL=(ALL) ALL # WARNING! Only use this together with 'Defaults targetpw'!
-
On each client system, in the
User privilege specificationsection, add these lines:<user> ALL=(ALL) NOPASSWD:/usr/sbin/mgr_check <user> ALL=(ALL) NOPASSWD:/home/<user>/enable.sh <user> ALL=(ALL) NOPASSWD:/home/<user>/bootstrap.sh
-
On each client system, in the
/home/user/.bashrcfile, add these lines:PATH=$PATH:/usr/sbin export PATH
-
On the SUSE Manager Server, in the
/etc/rhn/rhn.confconfiguration file, add or amend this line to include the unprivileged username:ssh_push_sudo_user = <user>
Because clients are in the DMZ and cannot reach the server, you need to use the mgr-ssh-push-init tool to register them with the SUSE Manager Server.
To use the tool, you will need the client hostname or IP address, and the path to a valid bootstrap script on the SUSE Manager Server. For more information about bootstrapping, see client-configuration:registration-bootstrap.adoc.
The bootstrap script will need to have an activation key associated with it that is configured for Push via SSH. For more information on activation keys, see client-configuration:clients-and-activation-keys.adoc.
Before you begin, you need to ensure that you have specified which ports to use for SSH tunneling. If you have registered clients before changing the port numbers, they will need to be registered again.
|
Clients that are managed with Push via SSH cannot reach the server directly.
When you use the |
-
At the command prompt on the SUSE Manager Server, as root, execute this command:
# mgr-ssh-push-init --client <client> --register \
/srv/www/htdocs/pub/bootstrap/bootstrap_script --tunnel
OPTIONAL: You can remove the
--tunneloption, if you do not want to use tunneling. -
Verify that the SSH connection is active:
# ssh -i /root/.ssh/id_susemanager -R <high_port>:<susemanager>:443 \
<client> zypper ref
You can use the API to manage which contact method to use.
This example Python code sets the contact method to ssh-push.
Valid values are:
-
default(pull) -
ssh-push -
ssh-push-tunnel
client = xmlrpclib.Server(SUMA_HOST + "/rpc/api", verbose=0)
key = client.auth.login(SUMA_LOGIN, SUMA_PASSWORD)
client.system.setDetails(key, 1000012345, {'contact_method' : 'ssh-push'})
If you have a client that has already been registered, and you want to migrate it to use Push via SSH, some extra steps are required.
You can use the mgr-ssh-push-init tool to set up your client.
-
At the command prompt on the SUSE Manager Server, as root, set up the client:
# mgr-ssh-push-init --client <client> \
/srv/www/htdocs/pub/bootstrap/bootstrap_script --tunnel
-
Using the SUSE Manager Web UI, change the client’s contact method to
ssh-pushorssh-push-tunnel. -
OPTIONAL: If you need to edit an existing activation key, you can do so with this command:
client.activationkey.setDetails(key, '1-mykey', {'contact_method' : 'ssh-push'})
You can also use Push via SSH for clients that connect using a SUSE Manager Proxy. Ensure your proxy is updated before you begin.
-
At the command prompt on the SUSE Manager Proxy, as root, set up the client:
# mgr-ssh-push-init --client <client> \
/srv/www/htdocs/pub/bootstrap/bootstrap_script --tunnel
-
At the command prompt on the SUSE Manager Server, copy the SSH key to the proxy:
mgr-ssh-push-init --client <proxy>
Push via Salt SSH
Push via Salt SSH is used in environments where Salt clients cannot reach the SUSE Manager Server directly. In this environment, clients are located in a firewall-protected zone called a DMZ. No system within the DMZ is authorized to open a connection to the internal network, including the SUSE Manager Server.
The Push via Salt SSH method creates an encrypted tunnel from the SUSE Manager Server on the internal network to the clients located on the DMZ. After all actions and events are executed, the tunnel is closed.
The server uses the salt-ssh tool to contact the clients at regular intervals, checking in and performing scheduled actions and events.
For more information about Salt SSH, see salt:salt-ssh.adoc.
This contact method works for Salt clients only. For traditional clients, use Push via SSH.
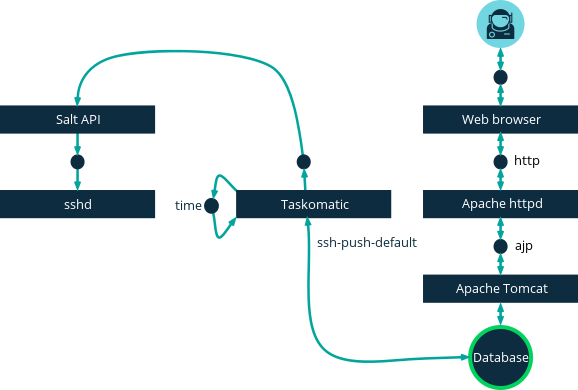
This image demonstrates the Push via Salt SSH process path.
All items left of the Taskomatic block represent processes running on a SUSE Manager client.
To use Push via Salt SSH, you must have the SSH daemon running on the client, and reachable by the salt-api daemon running on the SUSE Manager Server.
Additionally, Python must be available on the remote system, and be a version supported by Salt.
|
Red Hat Enterprise Linux 5, CentOS 5, and earlier are not supported, as they use unsupported versions of Python. |
-
In the SUSE Manager Web UI, navigate to and complete the appropriate fields.
-
Select an activation key with the Push via SSH contact method configured. For more information about activation keys, see client-configuration:clients-and-activation-keys.adoc.
-
Check the
Manage system completely via SSHcheckbox. -
Click Bootstrap to begin registration.
-
Confirm that the system has been registered correctly by navigating to .
When you are configuring Push via Salt SSH, you can modify parameters that are used when a system is registered, including the host, activation key, and password. The password is used only for bootstrapping, it is not saved anywhere. All future SSH sessions are authorized via a key/certificate pair. These parameters are configured in .
You can also configure persistent parameters that are are used system-wide, including the sudo user. For more information on configuring the sudo user, see the Push via SSH section in this chapter.
The Push via Salt SSH feature uses taskomatic to execute scheduled actions using salt-ssh.
The taskomatic job periodically checks for scheduled actions and executes them.
Unlike Push via SSH on traditional clients, the Push via Salt SSH feature executes a complete salt-ssh call based on the scheduled action.
There are some features that are not yet supported on Push via Salt SSH. These features will not work on Salt SSH clients:
-
OpenSCAP auditing
-
Beacons, resulting in:
-
Installing a package on a system using
zypperwill not invoke the package refresh. -
Virtual Host functions (for example, a host to guests) will not work if the virtual host system is Salt SSH-based.
-
For more information about Salt SSH, see https://docs.saltstack.com/en/latest/topics/ssh/.
OSAD
OSAD is an alternative contact method between SUSE Manager and its clients.
By default, SUSE Manager uses rhnsd, which contacts the server every four hours to execute scheduled actions.
OSAD allows registered client systems to execute scheduled actions immediately.
|
Use OSAD in addition to |
OSAD has several distinct components:
-
The
osa-dispatcherservice runs on the server, and uses database checks to determine if clients need to be pinged, or if actions need to be executed. -
The
osadservice runs on the client. It responds to pings fromosa-dispatcherand runsmgr_checkto execute actions when directed to do so. -
The
jabberdservice is a daemon that uses theXMPPprotocol for communication between the client and the server. Thejabberdservice also handles authentication. -
The
mgr_checktool runs on the client to execute actions. It is triggered by communication from theosa-dispatcherservice.
The osa-dispatcher periodically runs a query to check when clients last showed network activity.
If it finds a client that has not shown activity recently, it will use jabberd to ping all osad instances running on all clients registered with your SUSE Manager server.
The osad instances respond to the ping using jabberd, which is running in the background on the server.
When the osa-dispatcher receives the response, it marks the client as online.
If the osa-dispatcher fails to receive a response within a certain period of time, it marks the client as offline.
When you schedule actions on an OSAD-enabled system, the task will be carried out immediately.
The osa-dispatcher periodically checks clients for actions that need to be executed.
If an outstanding action is found, it uses jabberd to execute mgr_check on the client, which will then execute the action.
OSAD clients use the fully qualified domain name (FQDN) of the server to communicate with the osa-dispatcher service.
SSL is required for osad communication.
If SSL certificates are not available, the daemon on your client systems will fail to connect.
Make sure your firewall rules are set to allow the required ports.
For more information, see [tab.install.ports.server].
-
At the command prompt on the SUSE Manager Server, as root, start the
osa-dispatcherservice:systemctl start osa-dispatcher
-
On each client, install the
mgr-osadpackage from theToolschild channel. Themgr-osadpackage should be installed on clients only. If you install themgr-osadpackage on your SUSE Manager Server, it will conflict with theosa-dispatcherpackage. -
On each client, as root, start the
osadservice:systemctl start osad
Because
osadandosa-dispatcherare run as services, you can use standard commands to manage them, includingstop,restart, andstatus.
Each OSAD component is configured using local configuration files. We recommend you keep the default configuration parameters for all OSAD components.
| Component | Location | Path to Configuration File |
|---|---|---|
|
Server |
|
|
Client |
|
|
Client |
|
|
Both |
|
If your OSAD clients cannot connect to the server, or if the jabberd service takes a lot of time responding to port 5552, it could be because you have exceeded the open file count.
Every client needs one always-open TCP connection to the server, which consumes a single file handler.
If the number of file handlers currently open exceeds the maximum number of files that jabberd is allowed to use, jabberd will queue the requests, and refuse connections.
To resolve this issue, you can increase the file limits for jabberd by editing the /etc/security/limits.conf configuration file and adding these lines:
jabbersoftnofile5100
jabberhardnofile6000
Calculate the limits required for your environment by adding 100 to the number of clients for the soft limit, and 1000 to the current number of clients for the soft limit. In the example above, we have assumed 500 current clients, so the soft limit is 5100, and the hard limit is 6000.
You will also need to update the max_fds parameter in the /etc/jabberd/c2s.xml file with your chosen hard limit:
<max_fds>6000</max_fds>