SUSE Manager Server Setup
This section covers SUSE Manager Server setup, using these procedures:
-
Start SUSE Manager setup with YaST
-
Create the main administration account with the SUSE Manager Web UI
-
Name your base organization and add login credentials
-
Synchronize the SUSE Linux Enterprise product channel from SUSE Customer Center
|
Third Party Software
SUSE Manager is part of the SUSE Linux Enterprise 4.0 product family and thus compatible with the software shipped with SUSE Linux Enterprise Server. SUSE Manager is a complex system, and therefore installing third party software is not allowed. Installing monitoring software provided by a third party vendor is allowed only if you do not exchange basic libraries such as SSL, cryptographic software, and similar tools. As part of providing product support, SUSE reserves the right to ask to remove any third party software (and associated configuration changes) and then to reproduce the problem on a clean system. |
Set up SUSE Manager with YaST
This section will guide you through SUSE Manager setup procedures.
-
Log in to the SUSE Manager Server and type
yast2 susemanager_setupto begin the setup.
-
From the introduction screen select and click Next to continue.
-
Enter an email address to receive status notifications and click Next to continue. SUSE Manager can sometimes send a large volume of notification emails. You can disable email notifications in the Web UI after setup, if you need to.
-
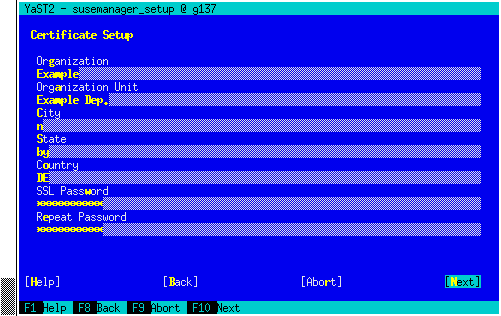
Enter your certificate information and a password. Passwords must be at at least seven characters in length, and must not contain spaces, single or double quotation marks (
'or"), exclamation marks (!), or dollar signs ($). Always store your passwords in a secure location.Certificate PasswordWithout this password it will not be possible to set up a SUSE Manager Proxy Server.
-
Click Next to continue.
-
From the screen, enter a database user and password and click Next to continue. Passwords must be at at least seven characters in length, and must not contain spaces, single or double quotation marks (
'or"), exclamation marks (!), or dollar signs ($). Always store your passwords in a secure location.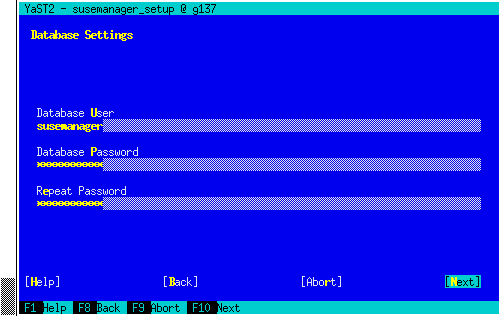
-
Click Next to continue.
-
Click Yes to run setup when prompted.
-
When setup is complete, click Next to continue. You will see the address of the SUSE Manager Web UI.
-
Click Finish to complete SUSE Manager setup.
Creating the Main Administration Account
This section will walk you through creating your organizations main administration account for SUSE Manager.
|
Admin and User Accounts
The main administration account is the highest authority account within SUSE Manager and therefore account access information should be stored in a secure location. For security it is recommended that the main administrator creates low level admin accounts designated for administration of organizations and individual groups. |
-
In the browser, enter the address provided after completing setup. With this address you open the SUSE Manager Web UI.
-
In the Web UI, navigate to the field and enter your organization name.
-
In the and fields, enter your username and password.
-
Fill in the Account Information fields including an email for system notifications.
-
Click Create Organization to finish creating your administration account.
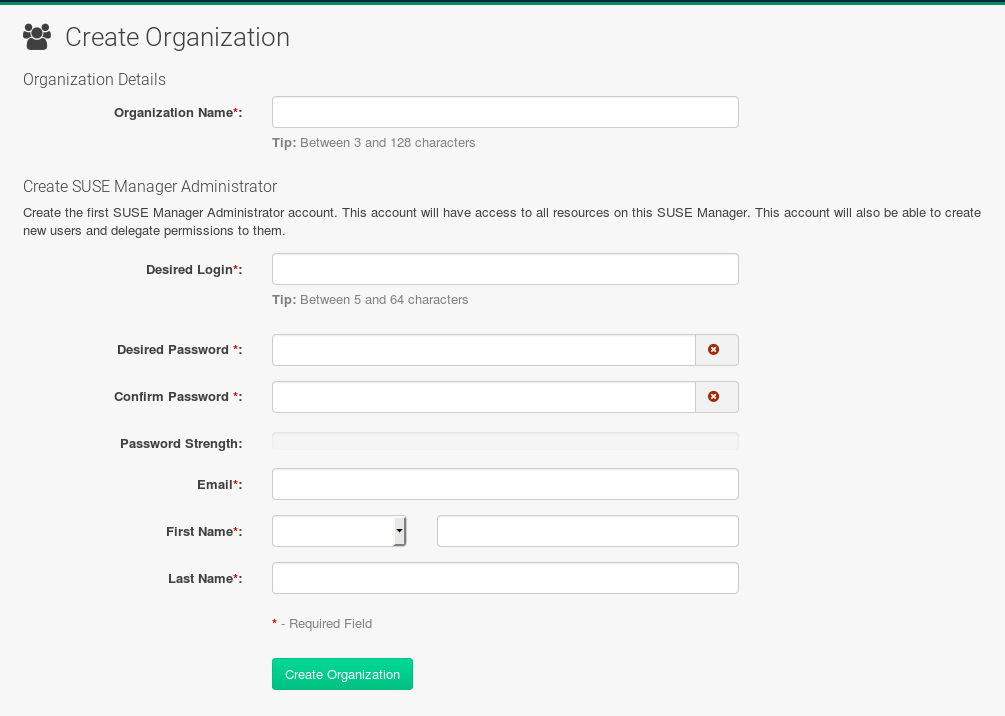
You are now presented with the SUSE Manager page.
Synchronizing Products from SUSE Customer Center
SUSE Customer Center (SCC) maintains a collection of repositories which contain packages, software and updates for all supported enterprise client systems. These repositories are organized into channels each of which provide software specific to a distribution, release, and architecture. After synchronizing with SCC clients may receive updates, and be organized into groups and assigned to specific product software channels.
This section covers synchronizing with SCC from the Web UI and adding your first client channel.
Before you can synchronize software repositories with SCC, you will need to enter organization credentials in SUSE Manager. In previous versions, so-called mirror credentials were used instead. The organization credentials give you access to the SUSE product downloads. You will find your organization credentials in https://scc.suse.com/organization.
Enter your organization credentials in the SUSE Manager Web UI:
-
In the SUSE Manager Web UI, select .
-
From the
Setup Wizardpage select the Organization Credentials tab. -
Click Add a new credential.
-
In the dialog, enter
UsernameandPassword, and confirm with Save.
When the credentials are confirmed with a check-mark icon, proceed with Procedure: Synchronizing with SUSE Customer Center.
-
In the Web UI, navigate to .
-
From the
Setup Wizardpage select the SUSE Products tab. Wait a moment for the products list to populate. If you previously registered with SUSE Customer Center a list of products will populate the table. This table lists architecture, channels, and status information. For more information, see Wizard.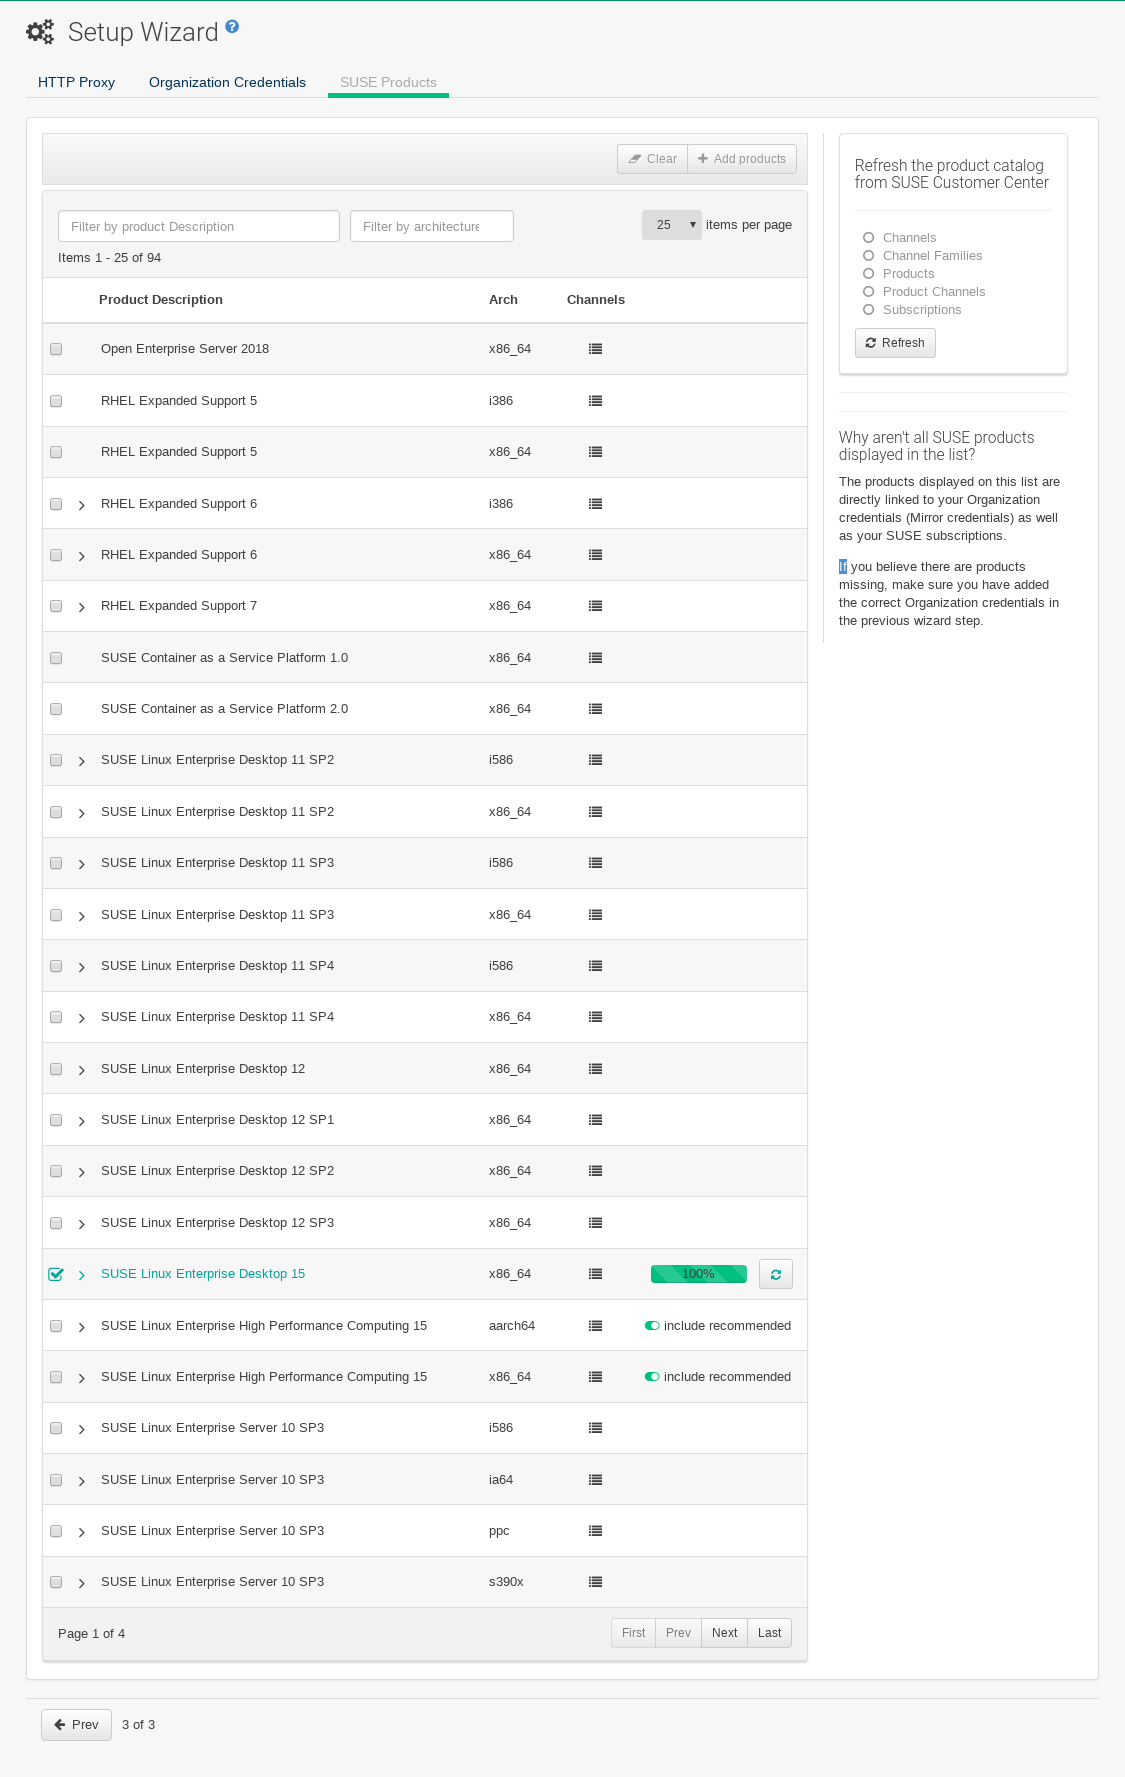
-
If your SUSE Linux Enterprise client is based on
x86_64architecture scroll down the page and select the check box for this channel now.-
Add channels to SUSE Manager by selecting the check box to the left of each channel. Click the arrow symbol to the left of the description to unfold a product and list available modules.
-
Click Add Products to start product synchronization.
-
After adding the channel, SUSE Manager will schedule the channel to be synchronized.
This can take a long time as SUSE Manager will copy channel software sources from the SUSE repositories located at SUSE Customer Center to local /var/spacewalk/ directory of your server.
|
PostgreSQL and Transparent Huge Pages
In some environments, Transparent Huge Pages provided by the kernel may slow down PostgreSQL workloads significantly. To disable Transparant Huge Pages set the GRUB_CMDLINE_LINUX_DEFAULT="resume=/dev/sda1 splash=silent quiet showopts elevator=noop transparent_hugepage=never" To write the new configuration run |
Monitor the channel synchronization process in real-time by viewing channel log files located in the directory /var/log/rhn/reposync:
tail -f /var/log/rhn/reposync/<CHANNEL_NAME>.log