Proxy Migration
SUSE Manager Proxy can be upgraded from version 3.2 to 4.0 if it was registered as a traditional client. The upgrade process is automated, but you will need to do some preparation steps before you can upgrade.
You will need to complete the SUSE Manager Server migration before you start.
The system must be running SUSE Manager 3.2 with all the latest updates applied. Before you start, ensure that the system is up to date and all updates have been installed successfully.
|
This process cannot be used to upgrade a SUSE Manager Proxy that was registered as a Salt client. |
Prepare to Migrate
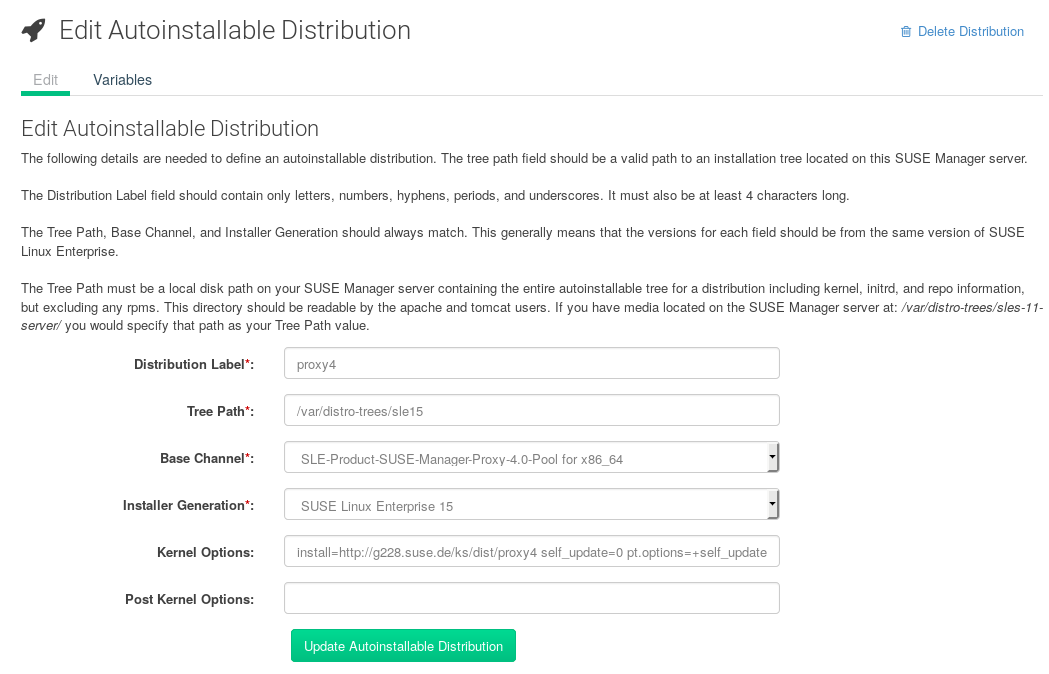
Before you can update your proxy, you will need an autoinstallation distribution, and an autoinstallation profile. The distribution must be based on SUSE Linux Enterprise 15 SP1, because SUSE Manager 4 is part of the SUSE Linux Enterprise 15 SP1 product family.
-
On the SUSE Manager Server, create a local directory for the SLE 15 installation media.
-
Download an ISO image with the installation sources, and mount the ISO image on your server:
mkdir /mnt/sle15
mount -o loop DVD1.iso /mnt/sle15
-
In the SUSE Manager Web UI, navigate to and click Create Distribution.
-
In the
Create Autoinstallable Distributionsection, use these parameters:-
In the
Distribution Labelsection, type a unique name for the distribution. Use only letters, numbers, hyphens (-), periods (.), and underscores (_), and ensure the name is longer than four characters. -
In the
Tree Pathfield, type an absolute path to the installation source. -
In the
Base Channelfield, selectSLE-Product-SUSE-Manager-Proxy-4.0-Pool for x86_64. -
In the
Installer Generationfield, selectSUSE Linux Enterprise 15. -
In the
Kernel Optionsfield, type any options to be passed to the kernel when booting for the installation. Theinstall=parameter and theself_update=0 pt.options=self_updateparameter are added by default. -
In the
Post Kernel Optionssection, type any options to be passed to the kernel when booting the installed system for the first time.
-
-
Click Create Autoinstallable Distribution to save.
When you have created an autoinstallable distribution, you can edit it by navigating to and selecting the distribution you want to edit.
Autoinstallation profiles contain all the installation and configuration data needed to install a system. They can also contain scripts to be executed after the installation is complete.
Use this example profile as a starting point for your own autoinstallation profile:
<?xml version="1.0"?>
<!DOCTYPE profile>
<profile xmlns="http://www.suse.com/1.0/yast2ns" xmlns:config="http://www.suse.com/1.0/configns">
  <add-on>
    <add_on_products config:type="list">
      <listentry>
        <ask_on_error config:type="boolean">true</ask_on_error>
        <media_url>http://$redhat_management_server/ks/dist/child/sle-product-suse-manager-proxy-4.0-updates-x86_64/proxy4</media_url>
        <name>sle-product-suse-manager-proxy-4.0-updates-x86_64</name>
        <product>SUSE Manager Proxy 4.0</product>
        <product_dir>/</product_dir>
      </listentry>
      <listentry>
        <ask_on_error config:type="boolean">true</ask_on_error>
        <media_url>http://$redhat_management_server/ks/dist/child/sle-module-basesystem15-sp1-pool-x86_64-proxy-4.0/proxy4</media_url>
        <name>sle-module-basesystem15-sp1-pool-x86_64-proxy-4.0</name>
        <product>SUSE Manager Proxy 4.0</product>
        <product_dir>/</product_dir>
      </listentry>
      <listentry>
        <ask_on_error config:type="boolean">true</ask_on_error>
        <media_url>http://$redhat_management_server/ks/dist/child/sle-module-basesystem15-sp1-updates-x86_64-proxy-4.0/proxy4</media_url>
        <name>sle-module-basesystem15-sp1-updates-x86_64-proxy-4.0</name>
        <product>SUSE Manager Proxy 4.0</product>
        <product_dir>/</product_dir>
      </listentry>
      <listentry>
        <ask_on_error config:type="boolean">true</ask_on_error>
        <media_url>http://$redhat_management_server/ks/dist/child/sle-module-server-applications15-sp1-pool-x86_64-proxy-4.0/proxy4</media_url>
        <name>sle-module-server-applications15-sp1-pool-x86_64-proxy-4.0</name>
        <product>SUSE Manager Proxy 4.0</product>
        <product_dir>/</product_dir>
      </listentry>
      <listentry>
        <ask_on_error config:type="boolean">true</ask_on_error>
        <media_url>http://$redhat_management_server/ks/dist/child/sle-module-server-applications15-sp1-updates-x86_64-proxy-4.0/proxy4</media_url>
        <name>sle-module-server-applications15-sp1-updates-x86_64-proxy-4.0</name>
        <product>SUSE Manager Proxy 4.0</product>
        <product_dir>/</product_dir>
      </listentry>
      <listentry>
        <ask_on_error config:type="boolean">true</ask_on_error>
        <media_url>http://$redhat_management_server/ks/dist/child/sle-module-suse-manager-proxy-4.0-pool-x86_64/proxy4</media_url>
        <name>sle-module-suse-manager-proxy-4.0-pool-x86_64</name>
        <product>SUSE Manager Proxy 4.0</product>
        <product_dir>/</product_dir>
      </listentry>
      <listentry>
        <ask_on_error config:type="boolean">true</ask_on_error>
        <media_url>http://$redhat_management_server/ks/dist/child/sle-module-suse-manager-proxy-4.0-updates-x86_64/proxy4</media_url>
        <name>sle-module-suse-manager-proxy-4.0-updates-x86_64</name>
        <product>SUSE Manager Proxy 4.0</product>
        <product_dir>/</product_dir>
      </listentry>
     </add_on_products>
  </add-on>
  <general>
      $SNIPPET('spacewalk/sles_no_signature_checks')
    <mode><confirm config:type="boolean">false</confirm></mode>
  </general>
  <upgrade>
    <only_installed_packages config:type="boolean">false</only_installed_packages>
    <stop_on_solver_conflict config:type="boolean">true</stop_on_solver_conflict>
  </upgrade>
  <backup>
    <sysconfig config:type="boolean">true</sysconfig>
    <modified config:type="boolean">true</modified>
    <remove_old config:type="boolean">false</remove_old>
  </backup>
  <networking>
    <keep_install_network config:type="boolean">true</keep_install_network>
    <start_immediately config:type="boolean">true</start_immediately>
  </networking>
  <software>
    <image/>
    <install_recommended config:type="boolean">true</install_recommended>
    <instsource/>
    <patterns config:type="list">
      <pattern>suma_proxy</pattern>
    </patterns>
    <products config:type="list">
      <listentry>SUSE-Manager-Proxy</listentry>
    </products>
  </software>
  <scripts>
    <chroot-scripts config:type="list">
      <script>
        <filename>cleanup.sh</filename>
        <chrooted config:type="boolean">true</chrooted>
        <interpreter>shell</interpreter>
        <source>
        <![CDATA[
#!/bin/sh
         sysconf_addword /etc/sysconfig/apache2 APACHE_MODULES wsgi
         if [ -e /etc/rhn/rhn.conf.rpmsave ]; then
             cp /etc/rhn/rhn.conf.rpmsave /etc/rhn/rhn.conf
         fi
         zypper rr --all
         ]]>
        </source>
      </script>
    </chroot-scripts>
  </scripts>
</profile>
Migration
Before you begin, check that all the channels referenced in the autoinstallation profile are available and fully synchronized.
-
On the SUSE Manager Server Web UI, navigate to and upload your autoinstallation profile.
-
In the
Kernel Optionsfield, enterautoupgrade=1 Y2DEBUG=1 -
OPTIONAL: The debug setting is not required but can help with investigating any future problems.
-
Check the
autoupgradeoption. -
In the
System List, select the proxy, navigate to theProvisioningtab, and select the autoinstallation profile you uploaded. -
Click Schedule Autoinstallation and Finish. The system will download the required files, change the bootloader entries, reboot, and start the upgrade.
Clean Up
When the SUSE Manager Proxy has finished upgrading process, it will still show the originally assigned channels.
|
If the server reports that there are updates available for the proxy, do not apply them before completing the clean up. |
-
On the SUSE Manager Server Web UI, navigate to the
System List, select the proxy, and navigate to the subtab. -
Clear the old channels.
-
In the
Base Channelfield, selectSLE-Product-SUSE-Manager-Proxy-4.0-Pool for x86_64. -
In the
Child Channelsfield, select all the recommended channels.
