Registering Clients with a Bootstrap Script
Registering your clients with a bootstrap script gives you more control over parameters, and can help if you have to register a large number of clients at once. This method works for both Salt and traditional clients.
To register clients using a bootstrap script, we recommend you create a template bootstrap script to begin, which can then be copied and modified. The bootstrap script you create is executed on the client when it is registered, and ensures all the necessary packages are deployed to the client. There are some parameters contained in the bootstrap script which ensure the client system can be assigned to its base channel, including activation keys, and GPG keys.
It is important that you check the repository information carefully, to ensure it matches the base channel repository. If the repository information does not match exactly, the bootstrap script will not be able to download the correct packages.
If you are bootstrapping Salt clients using the Web UI, you will need to ensure that the client system has Python installed before you begin.
For Salt clients running SUSE Linux Enterprise Server 12 or older, you will also require the python-xml package.
|
GPG Keys and Uyuni Client Tools
The GPG key used by Uyuni Client Tools is not trusted by default.
When you create your bootstrap script, add a path to the file containing the public key fingerprint with the |
|
SLES 15 and Python 3
SLE 15 uses Python 3 by default. Bootstrap scripts based on Python 2 must be re-created for SLE 15 systems. Attempting to register SLE 15 systems using Python 2 bootstrap scripts will fail. |
Create a Bootstrap Script
This procedure describes how to generate a bootstrap script.
-
In the SUSE Manager Web UI, navigate to .
-
In the
SUSE Manager Configuration - Bootstrapdialog, uncheck theBootstrap using Saltcheckbox if you are installing a traditional client. For Salt clients, leave it checked. Use default settings and click the Update button.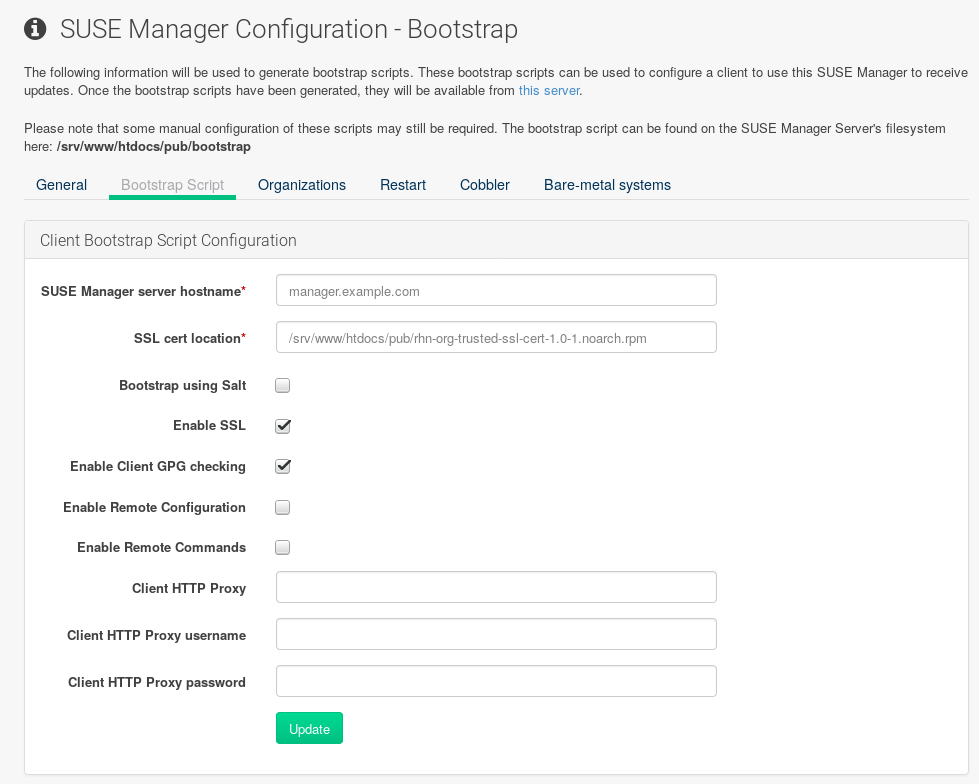 Using SSL
Unchecking Enable SSL in the Web UI or setting
USING_SSL=0in the bootstrap script is not recommended. If you disable SSL nevertheless you will need to manage custom CA certificates to be able to run the registration process successfully. -
A template bootstrap script is generated and stored on the server’s file system in the
/srv/www/htdocs/pub/bootstrapdirectory.cd /srv/www/htdocs/pub/bootstrap
The bootstrap script is also available at
https://example.com/pub/bootstrap/bootstrap.sh.
Edit a Bootstrap Script
You can copy and modify the template bootstrap script you created to customize it.
A minimal requirement when modifying a bootstrap script for use with SUSE Manager is the inclusion of an activation key.
Most packages are signed with GPG, so you will also need to have trusted GPG keys on your system to install them.
In this procedure, you will need to know the exact name of your activation keys.
Navigate to and click on Manage Activation keys.
All keys created for channels are listed on this page.
You must enter the full name of the key you wish to use in the bootstrap script exactly as presented in the key field.
-
Login as root from the command line on your SUSE Manager server.
-
Navigate to the bootstrap directory with:
cd /srv/www/htdocs/pub/bootstrap/
-
Create and rename two copies of the template bootstrap script for use with each of your clients.
cp bootstrap.sh bootstrap-sles11.sh
cp bootstrap.sh bootstrap-sles12.sh
-
Open
sles12.shfor modification. Scroll down and modify both lines marked in green. You must comment outexit 1with a hash mark (#) to activate the script and then enter the name of the key for this script in theACTIVATION_KEYS=field as follows:echo "Enable this script: comment (with #'s) this block (or, at least just" echo "the exit below)" echo #exit 1 # can be edited, but probably correct (unless created during initial install): # NOTE: ACTIVATION_KEYS *must* be used to bootstrap a client machine. ACTIVATION_KEYS=1-sles12 ORG_GPG_KEY=
-
When you have finished, save the file, and repeat this procedure for the second bootstrap script.
Connect Clients
When you have finished creating your script, you can use it to register clients.
-
On the SUSE Manager Server, log in as root at the command prompt, and navigate to this directory:
cd /srv/www/htdocs/pub/bootstrap/
-
Run this command to execute the bootstrap script on the client:
cat MODIFIED-SCRIPT.SH | ssh root@example.com /bin/bash
The script will execute and proceed to download the required dependencies located in the repositories directory you created earlier.
-
When the script has finished running, you can check that your client is registered correctly by opening the SUSE Manager Web UI and navigating to to ensure the new client is listed.
|
When new packages or updates are installed on the client using SUSE Manager, any end user license agreements (EULAs) are automatically accepted. To review a package EULA, open the package detail page in the Web UI. |
Package Locks
|
Package locks can only be used on traditional clients that use the Zypper package manager. The feature is not currently supported on Red Hat Enterprise Linux or Salt clients. |
Package locks are used to prevent unauthorized installation or upgrades to software packages on traditional clients. When a package has been locked, it will show a padlock icon, indicating that it can not be installed. Any attempt to install a locked package will be reported as an error in the event log.
Locked packages can not be installed, upgraded, or removed, either through the SUSE Manager Web UI, or directly on the client machine using a package manager. Locked packages will also indirectly lock any dependent packages.
-
On the client machine, install the
zypp-plugin-spacewalkpackage:# zypper in zypp-plugin-spacewalk
-
Navigate to the tab on the managed system to see a list of all available packages.
-
Select the packages to lock, and click Request Lock. You can also choose to enter a date and time for the lock to activate. Leave the date and time blank if you want the lock to activate as soon as possible. Note that the lock might not activate immediately.
-
To remove a package lock, select the packages to unlock and click Request Unlock. Leave the date and time blank if you want the lock to deactivate as soon as possible. Note that the lock might not deactivate immediately.