Client Migration
Upgrading traditional clients from earlier SLE 12 Service Packs to later SLE 12 Service Packs is fully automated. For example, upgrading from SLE 12 SP1 to SLE 12 SP4. This also applies for other supported products based on SLE 12.
Upgrading traditional clients from SLE 12 with the latest Service Pack to SLE 15 is also automated, but you will need to do some preparation steps before you can upgrade.
For supported SUSE Linux Enterprise 15 upgrade paths, see https://www.suse.com/documentation/sles-15/book_sle_upgrade/data/sec_upgrade-paths_supported.html
|
This process cannot be used to upgrade Salt clients. |
Upgrade Clients from SLE 12 to SLE 15
Your clients must have the latest available SLE 12 Service Pack, with all the latest updates applied. Before you start, ensure that the system is up to date and all updates have been installed successfully.
The upgrade is controlled by YaST and AutoYaST, it does not use Zypper.
Prepare to Migrate
Before you can migrate your client from SLE 12 to SLE 15, you need to make these preparations:
-
Prepare installation media
-
Create an auto-installation distribution
-
Create an activation key
-
Upload an AutoYaST profile
-
On the SUSE Manager Server, create a local directory for the SLE 15 installation media.
-
Download an ISO image with the installation sources, and mount the ISO image on your server:
mkdir /mnt/sle15
mount -o loop DVD1.iso /mnt/sle15
-
In the SUSE Manager Web UI, navigate to and click Create Distribution.
-
In the
Create Autoinstallable Distributionsection, use these parameters:-
In the
Distribution Labelsection, type a unique name for the distribution. Use only letters, numbers, hyphens (-), periods (.), and underscores (_), and ensure the name is longer than four characters. -
In the
Tree Pathfield, type an absolute path to the installation source. For example,/mnt/sle15. -
In the
Base Channelfield, selectSLE-Product-SLES15-Pool for x86_64. -
In the
Installer Generationfield, selectSUSE Linux Enterprise 15. -
In the
Kernel Optionsfield, type any options to be passed to the kernel when booting for the installation. Theinstall=parameter and theself_update=0 pt.options=self_updateparameter are added by default. -
In the
Post Kernel Optionssection, type any options to be passed to the kernel when booting the installed system for the first time.
-
-
Click Create Autoinstallable Distribution to save.
In order to switch from the old SLE 12 SP4 base channel to the new SLE 15 channel, you need an activation key.
-
In the SUSE Manager Server Web UI, navigate to and click
Create Key. -
Enter a description for your key.
-
Enter a key or leave it blank to generate an automatic key.
-
OPTIONAL: If you want to limit the usage, enter your value in the
Usagetext field. -
Select the
SLE-Product-SLES15-Pool for x86_64base channel. -
OPTIONAL: Select any
Add-On System Types. For more information, see https://www.suse.com/documentation/sles-15/book_quickstarts/data/art_modules.html. -
Click Create Activation Key.
-
Click the
Child Channelstab and select the required channels. -
Click Update Key.
Create an AutoYaST profile. For more information about AutoYaST, see client-configuration:autoyast.adoc.
-
In the SUSE Manager Server Web UI, navigate to and click
Upload Kickstart/Autoyast File. -
Paste the XML content in the text area or select the file to upload and click Create.
-
Navigate to the
Detailstab. -
In the
Kernel Optionsfield, selectautoupgrade=1and click Update. -
Navigate to the
Variabletab. -
In the
registration_key=field, enter the activation key, and click Update Variables.
Migration
Before you begin the migration, make sure that the migration target channels are completely mirrored.
For the upgrade to SUSE Linux Enterprise 15, at least the SLE-Product-SLES15-Pool base channel with the SLE-Manager-Tools15-Pool child channel for your architecture is required.
The matching update channels such as SLE-Manager-Tools15-Updates and SLE-Product-SLES15-Updates are recommended.
You can monitor the mirroring progress in /var/log/rhn/reposync/sles15-pool-x86_64.log.
-
In the SUSE Manager Server Web UI, navigate to
Systemsand select the client to be upgraded. -
Navigate to , and select the AutoYaST profile you uploaded.
-
Click Schedule Autoinstallation and Finish.
Next time the client synchronizes with the SUSE Manager Server, it will receive a re-installation job.
The re-installation job fetches the new kernel and initrd packages.
It will also write a new /boot/grub/menu.lst, containing pointers to the new kernel and initrd packages.
When the client next boots, it will use grub to boot the new kernel with its initrd. PXE booting is not used during this process.
Approximately three minutes after the job was fetched, the client will go down for reboot.
Upgrade Clients within SLE 12
Traditional clients on earlier SLE 12 Service Packs can be upgraded to later SLE 12 Service Packs in the SUSE Manager Web UI.
For example, upgrading from SLE 12 SP1 to SLE 12 SP4.
Before you begin the migration, make sure that the migration target channels are completely mirrored.
For the upgrade to SUSE Linux Enterprise 12 SP4, at least the SLES12-SP4-Pool base channel with the SLE-Manager-Tools12-Pool child channel for your architecture is required.
The matching update channels such as SLE-Manager-Tools12-Updates and SLES12-SP4-Updates are recommended.
You can monitor the mirroring progress in /var/log/rhn/reposync/sles15-pool-x86_64.log.
-
In the SUSE Manager Server Web UI, navigate to
Systemsand select the client to be upgraded. -
If the
System Detailspage has outstanding software updates, install the updates. -
Navigate to the tab, select
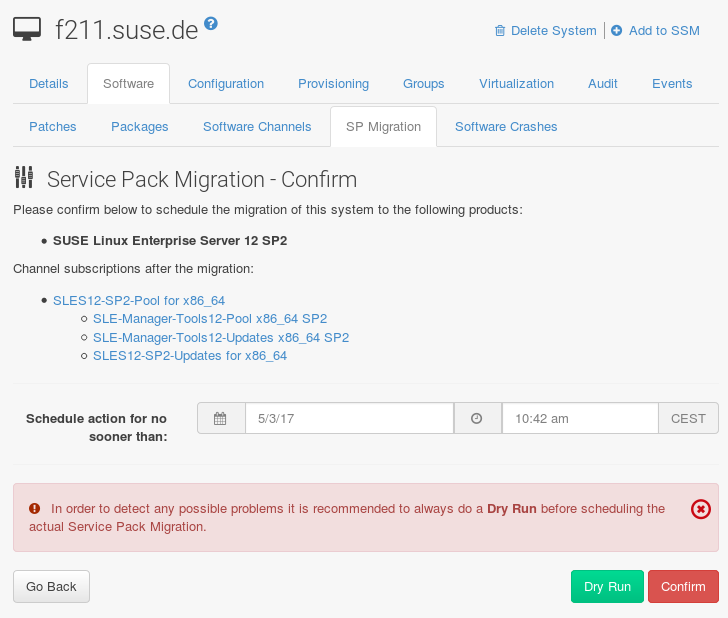
SUSE Linux Enterprise Server 12 SP4, and click Select Channels. -
Select the mandatory child channels, and any optional child channels. Click Schedule Migration.
-
Choose a time for the migration, and click Confirm. You can also perform a dry run of the migration to check that it will be successful.
You can check the progress of the migration by navigating to .
If the system status reports that the migration has failed, but also shows that software updates are available, install the update and check the status again.
After the migration is complete, schedule a reboot of the client from the SUSE Manager Server.